|
|
|
Creating Lara Outfits Page 12 |
|
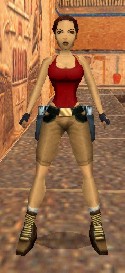
Page 1 - 2 - 3 - 4 - 5 - 6 - 7 - 8 - 9 - 10 - 11 - 12 - 13 - 14 If you are using VicMan's Photo Editor then select the "Red" Paint Can from the toolbar. Click on the white color in the color palette. Click anywhere on the image in the Editing window to change everything to white. Now select the Pencil tool. On the toolbar at the top, click on the "Line drawing" icon. Set the nib "Size" to 3. Set the "Transparency" to 0%. Set the "Zoom" to about 800%. Make sure that the top of you image is all showing. The X and Y values should each be 0. Click on the green square in the color palette. Draw a horizontal line across the top of the image. Click on the red color in the palette and draw a vertical line down the right hand side of the image. Click on the blue color and draw a line across the bottom of the image. Click on the red color and then slide the pointer on the middle "G" color bar over towards the middle. Watch the "Foreground" square in the toolbar and adjust the slider until you have an orange color. Draw an orange line down the left side of the image. Click File... Save. This will save it back over itself. Now load in each of the other 3 bitmaps (35, 63, and 64) and do the same thing to each of them. Save them right back on top of themselves. Close your image editing program and boot up StrPix3 again. Click File... Open.... and load in the "tut1.WAD" file from your "Laras Outfits\Preview" folder. Over at the left side select Texture#31. Click the "Import" button and load your "Text31.bmp" file from your "Laras Closet\Workspace" folder. Select Texture#35 and then Import "Text35.bmp." Do the same for 63 and 64. Click File... Save as... and maneuver to your "Laras Closet\Preview" folder. Save this as "tut1.WAD." Exit from the StrPix3 program and use your Windows Explorer to copy all of your "tut1" wad files from your "Laras Closet\Preview" folder to your "trle\graphics\wads" folder. Boot the Level Editor and load in your "tut1_starter.PRJ." Output a tut1 wad as before. Use the Level Converter to build this level and then boot up the Level Editor game. Select the "Playable Tutorial Level." Get Lara where you can look at her legs. You'll have to get fairly close.
Now let's look at her left leg. The front has two tiles with green across the top, red down the right sides, orange down the left, and blue across the bottom. Label these as Type C. The rear of her left leg has three tiles. A triangle on the left side and then two rectangles to its right. The triangle has green across the top and orange down its left side. This is the same as Type C with its right half clipped so label it Type C. The middle rectangle has blue across the top, orange down the right, red down the left, and green across the bottom. Label this as Type D. The final rectangle on the right has a Type C orientation so label it Type C. We now have the information we need to texture our tiles.
Now, looking at the sketches we made of Lara's legs, compare each tile on her legs to the same "Type" rectangle that I've just had you draw. You should see that if the shaded portion of each rectangle were at the top, their orientations would match perfectly. Notice that our two short wide rectangles will be tall and narrow when turned the way that they are on Lara's legs. Had we used all tall narrow rectangles, the textures in them would have had to have been shrunk in height and stretched in width in order to fit them into the tiles once they were rotated to the proper orientation. This would have caused a lot of distortion. We're going to be defining a line across each section as the height of Lara's pants and we need to have all of them match and we therefore need to keep distortion at a minimum. The sketches that you have just made of the four rectangles are the key to how we are going to texture the tiles in our bitmap. Boot up your image editing program. Load in the "Text31.bmp" file from your "Laras Closet\Workspace" folder. It will still be white with colored sides. This will be our "Type C" rectangle. It's the only one that has a proper orientation when placed on Lara. If you are using VicMan's Photo Editor, set the zoom to about 800% and then click on the white color in the color palette. Both the "Foreground" and "Background" indicators in the toolbox should be white. Select the "Red" Paint Can tool in the toolbox and click anywhere in one of the colored borders. This should make it completely white. Now set the RGB values to 228, 164, and 96. This is her skin color. Select the "Black" Paint Can tool from the toolbox and click anywhere in the white area. It should all turn flesh colored. Next set the RGB colors to 172, 125, and 71. We used this color earlier for her pants.
|
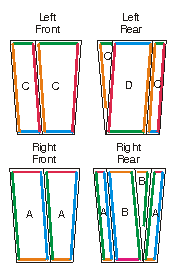 Here's what you should find. The
front of her right leg has two tiles. They each have red across the
top and thus orange across the bottom. They each have blue on the
right side and green on the left side. Make a sketch of this (see
the image at the right) and label each orientation as Type A. The
back of her right leg consists of 4 tiles. You'll have to turn her a
little left and right to see the ones on the side. Going from left
to right there's two rectangles, then a triangle, and then another
rectangle. The far left rectangle has the same orientation as our
Type A has so label it Type A. The next rectangle to the right has
orange across the top, green down the right side, blue down the left
side, and red across the bottom. Label this as Type B. The triangle
has the same orientation but its left side has been clipped. Label
it Type B. The final rectangle has a Type A orientation so label it
Type A.
Here's what you should find. The
front of her right leg has two tiles. They each have red across the
top and thus orange across the bottom. They each have blue on the
right side and green on the left side. Make a sketch of this (see
the image at the right) and label each orientation as Type A. The
back of her right leg consists of 4 tiles. You'll have to turn her a
little left and right to see the ones on the side. Going from left
to right there's two rectangles, then a triangle, and then another
rectangle. The far left rectangle has the same orientation as our
Type A has so label it Type A. The next rectangle to the right has
orange across the top, green down the right side, blue down the left
side, and red across the bottom. Label this as Type B. The triangle
has the same orientation but its left side has been clipped. Label
it Type B. The final rectangle has a Type A orientation so label it
Type A.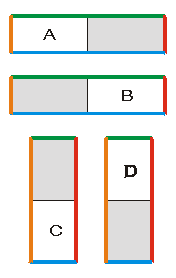 Let's get a better idea as to what
we have here. We have 4 differently oriented images labeled A to D.
On a scratch piece of paper draw two rectangles that are much wider
than they are tall. Draw two more rectangles that are much taller
than they are wide. (see the image at the right) I use colored
pencils to do this but if you don't have any you can just write on
each side what color that side is. Color each rectangle with a green
border at the top, a red right side, a blue bottom, and an orange
left side. This is exactly as our "Key" is colored. Label one of the
short wide rectangles "Type A" and the other "Type B." Label one of
the tall narrow rectangles "Type C" and the other "Type D." Shade in
the right half of your "Type A" rectangle. Shade in the left half of
your "Type B" rectangle. Then shade in the top of your "Type C"
rectangle and the bottom of your "Type D" rectangle. The shaded area
will match the area where her pants will be.
Let's get a better idea as to what
we have here. We have 4 differently oriented images labeled A to D.
On a scratch piece of paper draw two rectangles that are much wider
than they are tall. Draw two more rectangles that are much taller
than they are wide. (see the image at the right) I use colored
pencils to do this but if you don't have any you can just write on
each side what color that side is. Color each rectangle with a green
border at the top, a red right side, a blue bottom, and an orange
left side. This is exactly as our "Key" is colored. Label one of the
short wide rectangles "Type A" and the other "Type B." Label one of
the tall narrow rectangles "Type C" and the other "Type D." Shade in
the right half of your "Type A" rectangle. Shade in the left half of
your "Type B" rectangle. Then shade in the top of your "Type C"
rectangle and the bottom of your "Type D" rectangle. The shaded area
will match the area where her pants will be.